Docker Series (Chapter 4/4): Introducing Container Network and Practising Container Data Management
For information on how to install Docker, please refer to: Docker Series (Chapter 0): Installing docker-engine in Ubuntu.
For guidance on how to create and use Docker images, please refer to: Docker Series (Chapter 1): Building and using images.
For guidance on how to create and use Docker containers, please refer to: Docker Series (Chapter 2): Creating and Using containers.
For guidance on how to manage Docker resources, please refer to: Docker Series (Chapter 3): Managing Container Resources.
This will be the final chapter of the Docker series. In this chapter, I will introduce the native networking and data management aspects of Docker containers.
Ice-breaking topic
1 | docker run --rm -it centos /bin/bash |
At first, let’s begin to create a container using the above command here.
Then, we are trying to ping <www.baidu.com> in the interactive interior terminal console in the container.
1 | shy@flash-shy:~$ docker run --rm -it centos /bin/bash |
It’s interesting we just use these parameters when creating the container.
--rm: This option tells Docker to automatically remove the container once it stops running. This is useful for keeping things clean when you’re running a container for a short-term task (like we are debugging or testing).-i: This option stands for interactive, which keeps the container’s standard input open. i is the abbreviation of the Capital letter in interactive.-t: This option allocates a pseudo-TTY (a terminal interface) for the container. This is what allows you to interact with the container via a command line.centos: This specifies the Docker image to use./bin/bash: This is the command to run inside the container. It will start a bash shell session inside the CentOS container, allowing you to interact with it like you’re logged into a normal Linux system.
When we create a container, we haven’t attached a network interface card (NIC), nor have we set an IP address, let alone configured an external network route. So, how is it that our ping operation is successful?
Container Original Network
Docker natively provides several types of networks. If we are not satisfied with the default networks, we can also create custom networks. The default networks are: none, bridge, and host. These networks are automatically created when Docker is installed. We can view them using the following command.
1 | shy@flash-shy:~$ docker network ls |
none network
If a container uses the none network, it will not have a typical network interface card (NIC) as we generally understand it. Instead, it will only have the loopback (lo) network. To use this network, you simply need to specify --network=none when creating the container.
Now, let’s think: What might be the use case for this network?
The none network is a more isolated network, suitable for scenarios that require high security and no network connectivity. For instance, applications like receiving verification codes or generating random numbers on your phone could benefit from being placed on the ‘none’ network to prevent data from being intercepted.
host network
The host network, on the other hand, is a network where a container shares the host’s network stack. You can specify this network using --network=host when creating the container. When a container is in host network mode, its network configuration is identical to that of the host machine. This means the container can see all the network interfaces of the host, and its hostname will match that of the host as well. The major advantage of using the host network is its performance, as it offers high speed and excellent data transfer rates. However, any ports already in use by the host are unavailable to the container.”
bridge network
The bridge network is the default network driver used by Docker containers when no other network is specified. It creates a private internal network on the host system, and each container that uses this network can communicate with other containers on the same bridge network, as well as with the host machine.
In a bridge network, Docker automatically assigns a private IP address to each container. Containers can talk to each other using these private IPs, but they can't directly communicate with the external network unless you configure port forwarding. To access services running inside a container from outside, you’d typically map the container's internal ports to ports on the host machine.
Key Points of three types network
None Network: Completely isolated with no external network access, ideal for high-security, non-networked tasks.Host Network: Shares the host machine’s network stack, offering high performance, but limits port usage since the host’s ports are already in use.Bridge Network:Isolation: Containers are isolated from the outside world, but can communicate with each other within the same network.Port Mapping: If you want external access to a container’s services, you have to map its internal ports to the host machine’s ports.Default Mode: When you create a container without specifying a network, it will automatically use the bridge network.
Container Storage
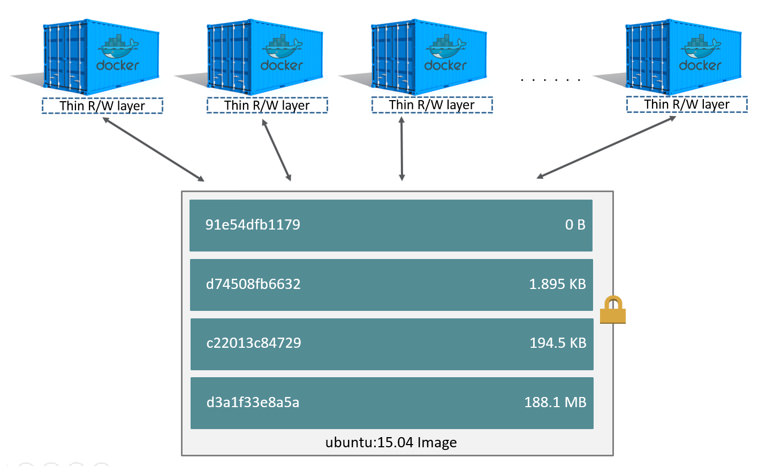
The Container and Layer
The biggest difference between a container and an image lies in the topmost writable layer. Any data written or modified within the container is directly stored in this writable layer. This means that when a container is deleted, the data in the writable layer is lost. Although each container has its own distinct writable layer, the underlying image can be shared across multiple containers.
The image picture here is based on the Official Website.
Widely Used Storage Drivers
When designing and using containers, the amount of data written to the container’s writable layer is usually very small. However, in operations, most of the data needs to be persistently stored. To address the volatility of the data in the writable layer, several storage drivers have been introduced in containers.
The mainstream supported storage drivers currently include as below.
Here, I referred to the Official Website and created the following table.
| Linux distribution | Recommended storage drivers | Alternative drivers |
|---|---|---|
| Docker Engine - Community on Ubuntu | overlay2 or aufs (for Ubuntu 14.04 running on kernel 3.13) | overlay¹, devicemapper², zfs, vfs |
| Docker Engine - Community on Debian | overlay2 (Debian Stretch), aufs or devicemapper (older versions) | overlay¹, vfs |
| Docker Engine - Community on CentOS | overlay2 | overlay¹, devicemapper², zfs, vfs |
| Docker Engine - Community on Fedora | overlay2 | overlay¹, devicemapper², zfs, vfs |
Copy-on-write Strategy
More detailed information, please visit the Official Website here.
| Operation | Execution |
|---|---|
| Create files | A new file can only be added to the container layer. |
| Delete files | Following the container’s layered structure, Docker looks from top to bottom. When the file is found, the delete operation is recorded in the container layer. The actual implementation is that UnionFS creates a “whiteout” file in the container layer, which effectively “masks” the deleted file. |
| Modify files | Docker follows the container’s layered structure from top to bottom. Once the file is found, the data from the image layer is copied to the container layer for modification. The modified data is then saved in the container layer (using copy-on-write). |
| Read files | Docker follows the container’s layered structure from top to bottom when reading files. |
Data Management
There are generally two methods for persisting data in containers:
- volume
- bind mount
Volume
1 | shy@flash-shy:~$ docker run -d --name volumetest -v /usr/local/apache2/htdocs httpd:latest |
Bind Mount
1 | shy@flash-shy:~$ docker run -d --name volumetest2 -v /mnt:/usr/local/apache2/htdocs httpd:latest |
Sharing data between the host machine and the container
1 | shy@flash-shy:~$ docker run -d -p 9000:80 -v /mnt:/usr/local/apache2/htdocs httpd:latest |
Sharing data between containers
1 | shy@flash-shy:~$ docker run -d --name share01 -v /mnt:/usr/local/apache2/htdocs httpd:latest |
Key Points about sharing data
Sharing data between the host machine and the container:
bind mount:
Mount a directory or file from the host machine into the container.volume:
Copy data from the host machine to the container's volume by using the cp command to copy the required data into the volume's directory.
Sharing data between containers:
bind mount:
Mount a directory or file from the host machine into multiple containers.volume:
Mount a volume into multiple containers.
Congratulations to you!
Up to now, I have already introduced all basic knowledge about docker to you.
That’s all I want to discuss here, thank you for your patience~
 Wechat
 Alipay